27 Sep 24
0 COMMENTS
17 Jan 23
0 COMMENTS
14 May 21
0 COMMENTS
How to control Dyson fans with Siri
Here are the config files:
Dyson Pure Cool Me config file
Dyson AM06 config config file (rename to config.json after downloading)
21 Jan 20
0 COMMENTS
Tags:
dyson
fan
siri
raspberry pi
broadlink
Nuisance calls from 0800 358 4487 claiming to be Three UK

At just after 6pm this evening I received the second call of the day from 0800 358 4487. On both occasions the caller claimed to be from 'Three, the mobile network'.
Yes, my phone is with Three and first caller did know what phone I had and when I ordered it, as well as my name, so in all likelihood they were who they said they were. Or, at least, they were acting on Three's behalf.
The first call was tolerable (although I can't remember if I specifically opted out from marketing calls or not when I ordered the phone - I usually do). Essentially they wanted to get other members of my family on a Three contract as well. I said politely that this wasn't of interest at which point the caller rapidly lost interested and said his goodbyes. Fair enough. That was in the early afternoon on a weekday, he knew my name and was, probably, from a company who's services I use. In fact the same sales team has even been complimented by an industry blogger here.
However, I was to receive a second call at 6pm. Just when my wife and I are trying to be quiet and sooth our 7 month old baby to sleep. I immediately recognised the number and, curious to see what they could possibly want for the second time in the same day, I answered. After hearing the same spiel about them being from Three etc, I told him I'd already been called earlier today. I was then interrogated as to the purpose of the first call. In the interests of discovering where he would go with this, I said 'special offers'.
This is where things started to get a bit out of hand. He started explaining to me that it was actually impossible that I could have received a call from them earlier. This was because the system couldn't call the same number twice in one day. I should be clear that this wasn't a kind, polite, explanation. It was, in fact, about as rude as it's possible to be whilst maintaining some level of composure.
So in no uncertain terms I was then being accused downright of lying. Clearly, even though they are from Three, they didn't have access to my recent calls list. I've attached a screenshot here for a giggle. The two cancelled outgoings were me accidentally calling them back while trying to view the call details.
Eventually I managed to part ways with this anti-salesman with only a baby to put back to sleep after being woken by the call.
The fact that this was a repeatedly unwanted call, coinciding with my baby's bedtime, was what prompted me to write this and see if anyone happens to search for the number and has been equally annoyed by their tactics and anti-social calling hours. I doubt I'll find the time to take my complaints in any official direction but I'm seriously tempted.
Update 12th July 2013: It seems they have forgotten my request not to be contacted again as today I have received two calls and a text. The first call, which I ignored, was from 0800 358 4486. Then I got a text which came up as 'FromTheee' on my phone. Then, at the anti-social hour of 18:45, I was called from 0800 358 4494. Suspecting Three, I answered to confirm this, and indeed it was. I'm assuming the first number was also them.
Update 19th November 2013: They have once again forgotten my request to not be contacted and are now calling me again from 0800 358 7281 at 18:25 - just as we're winding down for bed time with our 15 month old.
15 Mar 13
98 COMMENTS
Accessible CSS drop down menus with and without Javascript and in IE 6
Stylish CSS drop down menus are nothing new. They can be easily coded to be semantic with nested unordered lists and can also be made accessible to keyboard users with a bit of helpful javascript. They can even work without javascript enabled by adding the :hover pseudo class to the parent list element. However, IE 6's lack of support for this means without javascript IE 6 users simply won't be able to see the links.
There is a simple solution.
Step 1. Build the page for browsers without javsacript
Because we want this to work in IE6 we can't use the :hover pseudo class on the list items. Instead build your css and xhtml page but make sure all nested lists in the navigation menu are visible. Style it up as best you can to make it look acceptable, even though all the menus will be expanded. In the case of drop down menus that overlap if they're all visible, you will need to turn the menu into a normal line-by-line menu with the sub menus indented. This is how all users without javascript will see your page.
Step 2. Add some Javascript.
Now that we have a non-javascript menu that works in IE 6 we can make it work as a drop down menu for users who have javascript enabled. We're using jQuery to make this easier and to allow a nice fade in on the drop down menu. The first thing to do is add a class to our main menu as soon as possible. Then add the code to make the sub menus fade in and out on mouse over.
$(document).ready(function(){
	$("#mainNav").addClass("js");
	$("#mainNav li").hover(function(){
		$("ul",$(this)).fadeIn();
	},function(){
		$("ul",$(this)).fadeOut();
	});
});
Step 3. Add some style.
Now, we can use the “.js” class in our CSS to re-style the menu and override any of the style we added in step 1. Styling CSS drop down menus is well documented elsewhere so I won't go into too much detail here.
Step 4. Add some more javascript to enable full keyboard access.
What we have so far isn't enough to allow full keyboard control. Keyboard users would have to disable javascript as well as CSS to see the links. By adding a bit more jQuery we can make the drop down menus fully navigable via the keyboard.
$(document).ready(function(){
	$("#mainNav").addClass("js");
	$("#mainNav li").hover(function(){
		$("ul",$(this)).fadeIn();
	},function(){
		$("ul",$(this)).fadeOut();
	});
	$("a").focus(function(){ // hide drop downs
		$("#mainNav ul").fadeOut();
	});
	$("#mainNav li a").focus(function(){ // main nav anchor focus
		$("ul",$(this).parent()).fadeIn();
	});
	$("#mainNav li li a").unbind(); // unbind hide drop downs from sub nav anchors
});
Lets first look at the rule labelled ‘main nav anchor focus’. This is assigned to the top level anchors in the main menu as that is what the keyboard will tab between when the user uses the tab key to cycle through links. When the anchor gets focus it shows the drop down menu associated with it. The fact that this is now visible means the next time the user hits tab the first sub menu item will have focus, and as such can be visited.
When the user tabs past the last sub menu item we want the down down to fade out. This is why we added the ‘hide drop downs’ rule to all anchors. This means, when any item is tabbed to all menus will close. We want to avoid this happening when the user tabs to the sub menu items and of course when they tab to a sub menu parent item. That's why we add it before the $("#mainNav li a") rule. This means it will fire the sub nav hide first and then open the one that is tabbed to. We prevent the sub nav links firing it with the unbind rule at the end.
Thats it, CSS drop down menus with keyboard control in all browsers, with and without javascript enabled.
13 Mar 09
5 COMMENTS
Tags:
css
javascript
jquery
accessibility
web design
New website design: The Devon Carpenter - Phil Szaniszlo

“ In the begining...I knew nothing about websites other than the fact that I needed one to promote my work.
Now...I know that I have a very efective website that I am able to adapt and update MYSELF !
How is this possible?...Ben is a very clever man, and I am a very happy customer. ”
Testimonial by Phil Szaniszlo the Devon Carpenter
Phil Szaniszlo commissioned us to build a new website to use an advertising tool for his capentry services in Devon. The website was built with search engine optimization in mind and just a few weeks after launch his website is appearing at number one for his main Ggoogle phrase 'devon carpenter'.
We installed our new content management system on Phil's site to allow him to maintain and add to his website as time goes on. One of our philosophies here at Phototropic Productions is that we don’t want our customers to feel trapped in a circle of expensive mainatence fees just to make small edits to their websites. Phil can now edit his webiste when and how he wants and at no futher cost.
Most companies charge a lot to give this control to their customers as they know they won't get any more money out of the customer for making changes to the site. We believe that giving this control at a reasonable cost will help our word-of-mouth marketing and increase customer satisfaction, which is our first and foremost goal.
Learn more about our Exeter based website design services.
2 Aug 08
0 COMMENTS
Tags:
new
web design
How to host multiple websites with MAMP Pro and DynDNS
I've been trying to set up a system on my local machine that enables me to have multiple sites running as virtual hosts, each with it's own public URL so I can show clients etc before actually putting it on a remote server. The solution I soon realised would be MAMP Pro in conjunction with DynDNS.
However I couldn't quite work out how to set it up to work with multiple hosts. I got a domain in DynDNS pointing to my IP address but it would only show the default host set up in MAMP. I thought the wildcard subdomain on the DynDNS domain would correspond with the name of the host in MAMP. However, they all just showed the default host.
It turns out that you need to set up individual domain hosts in DynDNS and then use the full url of those in MAMP Pro as the name of the host (or just as an alias). For example, lets say you have two hosts in MAMP Pro, one called test and one called test1. In DynDNS you need to set up two hosts, you can call them whatever you like but lets say you choose test.dyndns.info (the second part can be one of several choices if you have a free account) and test1.dyndns.info. You will then need to add an alias to your hosts in MAMP Pro and call them test.dyndns.info and test2.dyndns.info for your respective hosts.
That's it - simple once you know but I couldn't find this piece of info anywhere!
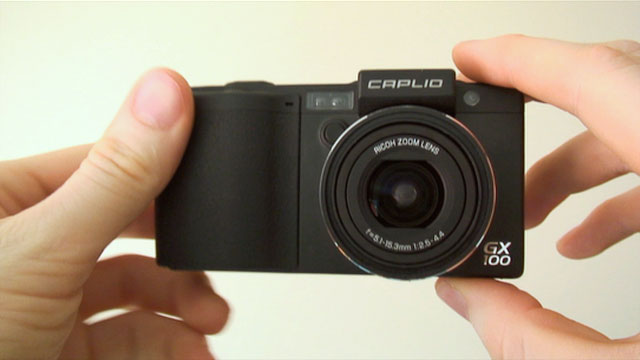
Ricoh Caplio GX100 review with RAW (DNG) sample images and video review
On this page:
- Differentiating Features
- Other GX100 Main Features
- Ricoh GX100 vs. other full manual compacts with raw support
- Sample Images and Files
- Conclusion
Differentiating Features
We'll start by looking at the main features that set the camera apart its competition.
Small size
When you hold this camera for the first time you will probably be surprised by it's size; especially if you're comparing it to the Canon G9 which seems to be it's main competitor. It's also much lighter than the G9. Play the video review to get a better sense of scale.
AAA batteries or proprietary battery
This is a very rare feature indeed and one that I find very useful. Considering it's size it is quite remarkable that Ricoh spent the time devising a battery housing that could not only accommodate it's 1150mAh proprietary battery but also 2 AAA batteries (not included with the camera) which are available in very high capacities
these days. To see this in action play the video review.
Wide Angle zoom lens
The appealing 24mm wide angle lens is another feature that sets this camera aside from it's competition. Although the compromise is the loss of a more powerful zoom, such as on the Canon G9. The Ricoh GX100 has a 3x optical zoom which takes it to 72mm at the telephoto end. The 24-72mm figures are 35mm equivalents, the actual lengths are 5.1-15.3mm.
It's not a particularly fast lens at the telephoto end with the widest aperture being f4.4; according to this diffraction limitation calculator thats only just fast enough for diffraction limitation to not be a problem. Of course its very subjective as to when diffraction limitation becomes noticeable.
Non-proprietary DNG raw format and mini-USB connection
Again Ricoh's support for non-proprietary formats will please many, myself included. Instead of creating yet another raw format, Ricoh wisely decided to use the DNG (Digital Negative) format which is widely supported. Incidentally the Richo GX100 uses a standard peripheral type USB connector so you won't need to remember to bring it's cable with you everywhere you go as you can use any normal mini-USB cable to connect to a computer. Unlike some Fuji cameras the Ricoh mounts as a mass storage device so there are no compatibility issues with computers either.
Other GX100 main features
We'll look at the camera's main features that are largely typical of it's competition.
10MP sensor, compared with the Canon G9's larger, 12.1MP sensor
The Ricoh GX100 sensor size is 1/1.75-inch which is slightly smaller than the Canon G9's 1/1.7-inch 12MP sensor. With the help of mathematic formulas beyond my grasp it's possible to calculate the pixel area of the two for comparison. Luckily that website has already calculated the pixel area for sensors of this size and megapixel count (Casio Exilim Z1080) as well as the G9. So the Ricoh GX100 has a pixel area of 4.36 and the Canon G9 has a pixel area of 3.8 - this means the Ricoh has an advantage in terms of noise and diffraction limitation, even though it has lower overall resolution. Of course the Canon's higher resolution means an image can be printed at a higher DPI thus reducing the impact of both noise and diffraction limitation, so there's probably little real world difference. Here are some excellent articles on diffraction limitation and sensor size.
Vibration (hand shake) correction
The Ricoh uses a CCD shift method of camera shake correction which seems to work well. If the camera is in an automatic or aperture priority mode it will in fact allow itself to expose brighter if the anti-shake function is turned on. In a test in a darkish room on aperture priority set to f2.9 the camera selected 1/5th second shutter speed without anti-shake on and 1/3rd second with it turned on.
1cm Macro mode
The Ricoh GX100 macro mode allows you to focus as close as 1cm from the lens when zoomed out, and still as close as 4cm when fully zoomed in. Thats very flexible but not uncommon among decent cameras.
Manual functions
Quite a rarity on this size of camera. It seems most manufacturers want to encourage sales of their DSLRS by removing manual control from their compacts. I don't think I'm alone in the desire for a compact carry-anywhere camera with full manual control and RAW output. As this article shows, the choice is somewhat limited. Non-the-less, the GX100 does have full manual focus, manual shutter speed and aperture control and raw support.
The interface is very customizable too which is great for setting up the camera to work for your personal style. More on this in the video review.
Customizable interface
The Ricoh GX100 has a very customizable interface. Of course this means it takes a little while to get it set up just how you like but it's worth it. The main control is the 'Adj.' (Adjustment) button on the back of the camera. This is a rocker/push button which is used to adjust he shutter speed when in manual mode by flicking it right or left. However, if you push it in you will be presented by a shortcut menu which contains up to 4 function which you specify. The available shortcuts are:
- Exposure Compensation
- White Balance
- ISO
- Quality
- Focus
- Image Settings
- AE Meter
- Continuous Mode
- Auto Bracket
- With Sound
Ricoh GX100 vs. other full manual compacts with raw support
The list of cameras presented on the 'Serious Compacts' article mentioned above is a good place to start when comparing the GX100 with similar cameras. Heres a little list of comparisons as food for thought.
- Ricoh GX100 (Buy UK
Buy USA
):
Widest lens in the bunch. 3x optical zoom (24mm-72mm), Small and quite light, good use of non-proprietary standards. Another few reviews. - Sigma DP1 (Buy UK
Buy USA
):
Very specifically spec'd camera with fixed 28mm lens. 4.64 MP (3 photosites per pixel though). APS-C size sensor. Pricey. (But, yes I want one) Sigma DP1 review. Another Sigma DP1 review. - Ricoh GRDII (Buy UK
Buy USA
):
Lightest of the bunch, but fixed lens at 28mm (no optical zoom). Ricoh GRDII review. - Canon G9 (Buy UK
Buy USA
):
Feature packed with 6x optical zoom (35mm-210mm), but quite large and heaviest of the bunch. Canon G9 Review. Another Canon G9 review. - Panasonic FZ8 (Buy UK
):
'Superzoom' type, big lens but with 12x optical zoom (36mm-432mm). Panasonic FZ8 review. - Panasonic LX2 (Buy UK
Buy USA
):
16:9 CCD and screen. 4x optical zoom (28mm-112mm). Few years old now. Panasonic LX2 review.
Of course I can't compare the image quality here as I haven't used all the cameras so this comparison is incomplete without such data. However the review links should help you make a decision.
Sample Images and files
The image quality of the Ricoh GX100 is generally very good but there a few things you need to be doing to get the best out it. The noise gets bad over ISO 100 but thats to be expected with this number of megapixels on such a small chip. With small sensors you either choose excellent resolution when using low ISOs or low megapixel/resolution cameras which can shoot with a wider range of ISOs.
The other issue with small sensors is diffraction limitation (see main features section above). This seems to affect the image quality if you use an aperture smaller (physically, i.e f6) than f3.2 but in practice you should be ok using f4.4.
This may seem like a hefty set of trade offs but thats the name of the game with small sensors and many megapixels. You either appreciate the limitations and enjoy the portability or get a digital SLR.
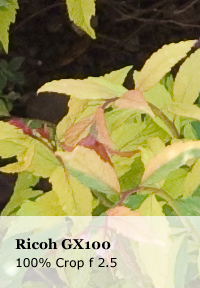
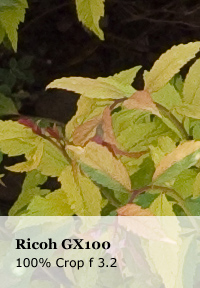
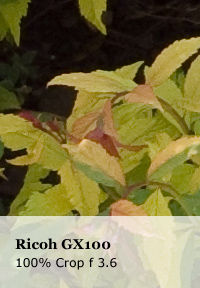
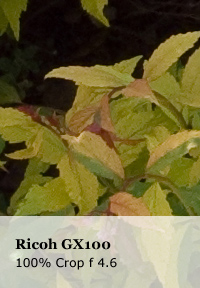
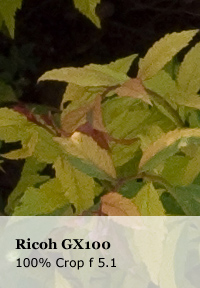
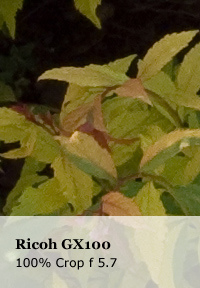
Aperture / Diffraction test
The following 100% crops show how diffraction affects the images as the aperture decreases. Each column contains exactly the same images. I duplicated them so that you can compare different results side by side. The images start to get softer after about f4.1 and are very soft indeed at f8.1 and f9.1.
These pictures were taken in aperture priority mode so the camera decided on a shutter speed. Interestingly f2.5 is over-exposed compared to the rest. I have tried to select a section of the image that isn't affected by the exposure difference too much as obviously this affects the clarity test.
These images have been sharpened manually in Adobe Lightroom
by identical amounts, just to give an accurate impression of the attainable clarity. As the sharpening is consistent throughout these samples it doesn't affect the test.


Below are a few of the original raw DNG files and Adobe Lightroom
processed jpgs that were taken for the above tests. Right click on the links and click 'Save target As..' or similar to avoid the browser trying to display the files. Remember all these files are of the same shot, just taken with different apertures, so it's unlikely you'll need to download all of the files.
Raw DNG file (f2.9) or Lightroom processed JPG (f2.9)
Raw DNG file (f3.2) or Lightroom processed JPG (f3.2)
Raw DNG file (f4.1) or Lightroom processed JPG (f4.1)
Raw DNG file (f6.5) or Lightroom processed JPG (f6.5)
Raw DNG file (f9.1) or Lightroom processed JPG (f9.1)
Wide angle lens test
Below are 9 100% crops taken from various positions in the image. The shot was taken at f2.9 so shouldn't be suffering from any diffraction limitation. Analysis of the samples follows the images. You can download the original raw DNG image used for this test or the Lighroom processed jpg.

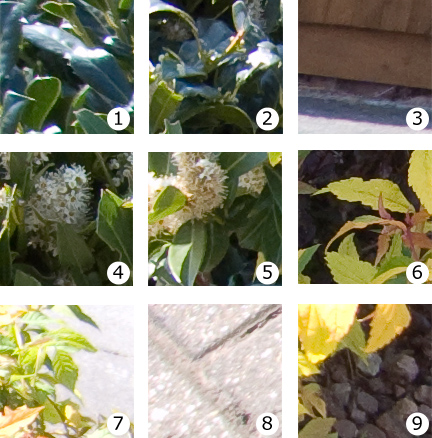
You can see top left and bottom left corners do suffer from blurring. But, considering this is taken on a zoom lens that goes as wide as 24mm I think it's acceptable. Sample 4 is still off-center and near the top left corner and the image is looking pretty clear at this point. There is slight softening at position 2 but not as pronounced as in position 1. Position 3 shows some chromatic abortions which I didn't try to correct but can usually be removed quite easily in Adobe Lightroom
. Sample 6, taken from the center is the best, as expected. The bottom left corner is again suffering a bit too.
Full zoom lens test
Below are 9 100% crops taken from various positions in the image. As the speed of the lens decreases when zoomed in the aperture had to be set at f4.4 which might be starting to show diffraction limitation. Analysis of the samples follows the images. You can download the original raw DNG image used for this test or the Lighroom processed jpg.
There is less blurring in the corners of this image. Compare position 1 with the similarly positioned sample in the wide angle test. Although possibly the overall sharpness is slightly less. This could be down to diffraction limitation though. There is significant blurring at position 3. However, it was a windy day so this could be due to the movement of the leaves.
Conclusion and where to buy
To conclude a review of the Ricoh GX100 we need to make sure we're discussing it in comparison with other cameras in it's class and appreciate the inherent limitations of this type of camera.
This means we need to appreciate that the ISO is going to cause a lot of noise if set to over 100 and diffraction limitation will come into play limiting the use of small apertures. However, it's a double edged sword as the reason a photographer might use a small aperture is to get a greater depth of field. With compact cameras with small sensors, the depth of field is naturally greater than a 35mm or digital SLR camera. So, the reason the diffraction limitation is in effect is also the solution to the problem.
Comparing the GX100 with it's competition (listed in the Ricoh vs others section above) is relatively easy they all offer very distinctive advantages/disadvantages. It should be clear to you by now which one is for you. For me I chose the Ricoh because I wanted the wide angle zoom lens and portability, but still with a 10MP image. Those requirements alone mean this camera is about my only choice. I'm happy to accept the diffraction limitation and high ISO noise issues as a trade-off for these virtues and am very happy with the camera. It's small size and minimal weight mean I can have it on me at all times which is something I have always wanted to do.
If, like me, you feel this camera is the one for you, you can usually find good deals at Amazon.co.uk
or Amazon.com if you're in the USA
.
8 May 08
0 COMMENTS
How to fix poor image quality (compression) when using T-Mobile Web 'n' Walk on a Mac
Update: I've been told this is also a possible fix for users experiencing upload issues with Three Mobile Broadband.
This has been covered before here: Hacking T-Mobile Web Proxy, indeed I discovered the fix from that page so all credit to lewiz.org.
However, this is such a fundamental issue as far as I'm concerned that I think it needs more publicity. T-mobile are selling mobile broadband packages and as far as I'm concerned that means the ability to view a webpage how it was intended to be viewed. Not as though viewed on a blurry 256 bit screen.
The problem is more threatening on the Mac because there is no apparent way around it at all. In IE on Windows if you hover over an image you see a tooltip explaining how to increase the quality of the image.
The solution is to use Firefox with an extension installed called 'Modify Headers'. You'll need to configure the extension once after its installed. Click Tools and then Modify Headers from the main Firefox menu bar. Then, you'll see at the top of it's window a drop down where you can choose 'Add', 'Modify' or 'Filter'. We want to choose 'Add'. Then in the next text input enter 'Pragma' (without quote marks) and then in the second text input add 'no-cache' (again without quote marks). Click the add button to add this rule. Then you need to add another rule. Again choose 'Add' from the drop down, then enter 'Cache-Control' and 'no-cache' into the two text inputs. Add this rule and make sure they are both enabled, they should have a green dot by them. Thats it. You should be able to surf away as you expect now.
Of course its still regrettable that one can't use Safari. If anyone knows a way to make Safari modify headers please let us know.
7 Apr 08
32 COMMENTS
Tags:
t-mobile
webnwalk
compression
mobile broadband
